流程图管理
2025/9/8大约 6 分钟


流程图管理
提示
前提条件:仔细阅读设计器集成
1. 查看流程图
提示
1、流程图页面入口是访问后端地址(前后端不分离):ip:port/warm-flow-ui/index.html?id=${insId}&type=FlowChart&Authorization=token
- insId:流程实例id
- type:查看流程图类型,固定写法
- token:用户token,共享后端权限(如token)
vue2
<template>
  <div :style="'height:' + height">
    <iframe :src="url"  style="width: 100%; height: 100%"/>
  </div>
</template>
<script>
  import {getToken} from "@/utils/auth";

  export default {
    name: "WarmChart",
    props: {
      // 组件调用时传入的流程实例ID
      insId: { type: [String, Number], default: null }
    },
    data() {
      return {
        height: document.documentElement.clientHeight - 200 + "px;",
        url: "",
      };
    },

    watch: {
      insId: {
        immediate: true, // 立即执行 handler 方法
        handler(newVal) {
          // 更新 url,添加时间戳防止缓存
          this.url = `${process.env.VUE_APP_FLOW_API}/warm-flow-ui/index.html?id=${newVal}&type=FlowChart&Authorization=Bearer ${getToken()}`;
        }
      }
    },

  };
</script>
vue3
待完善前后端不分离
可以直接访问后端接口加载页面,如:`ip:port/warm-flow-ui/index.html?id=${insId}&type=FlowChart&Authorization=token`

@Controller
@RequestMapping("/warm-flow")
public class WarmFlowController
{
    @GetMapping()
    public String index(String insId)
    {
        return redirect("/warm-flow-ui/index.html?id=" + insId + "&type=" + FlowChart);
    }
}

或者前端直接访问后端接口,如:`/warm-flow-ui/index.html?id=1839683148936663047&type=FlowChart`
/*打开新的页签,加载设计器*/
function detail(dictId) {
  var url = prefix + '/detail/' + dictId;
  $.modal.openTab("字典数据", "/warm-flow-ui/index.html?id=1839683148936663047&type=FlowChart");
}
React
待完善2. 提示信息

实现ChartExtService接口
- 实现
ChartExtService, 才会开启提示框 - 完上以上步骤后,
initPromptContent默认方法会自动执行, 初始化提示框和第一行提示信息, 如不满意, 可在execute方法中重新设置 - 如要返回自定义
节点提示信息, 请实现execute, 可参考以下实现类ChartExtServiceImpl - 如要返回自定义
顶部提示信息, 请实现execute, 可参考以下实现类ChartExtServiceImpl
/**
 * 流程图提示信息
 *
 * @author warm
 */
public interface ChartExtService {


  /**
   * 设置流程图提示信息
   * @param defJson 流程定义json对象
   */
  void execute(DefJson defJson);

  /**
   * 初始化流程图提示信息
   * @param defJson 流程定义json对象
   */
  default void initPromptContent(DefJson defJson) {
    defJson.setTopText("流程名称: " + defJson.getFlowName());
    defJson.getNodeList().forEach(nodeJson -> {
      // 提示信息主对象
      PromptContent promptContent = new PromptContent();

      // 设置 dialogStyle 样式
      promptContent.setDialogStyle(MapUtil.mergeAll(
              "position", "absolute",
              "backgroundColor", "#fff",
              "border", "1px solid #ccc",
              "borderRadius", "4px",
              "boxShadow", "0 2px 8px rgba(0, 0, 0, 0.15)",
              "padding", "8px 12px",
              "fontSize", "14px",
              "zIndex", 1000,
              "maxWidth", "500px",
              "pointerEvents", "none",
              "color", "#333"
      ));

      // 创建 info 列表
      List<PromptContent.InfoItem> infoList = new ArrayList<>();

      // 添加第一个条目: 任务名称
      PromptContent.InfoItem item = new PromptContent.InfoItem()
              .setPrefix("任务名称: ")
              .setContent(nodeJson.getNodeName())
              .setContentStyle(MapUtil.mergeAll("border", "1px solid #d1e9ff",
                      "backgroundColor", "#e8f4ff",
                      "padding", "4px 8px",
                      "borderRadius", "4px"
              ))
              .setRowStyle(MapUtil.mergeAll("fontWeight", "bold",
                      "margin", "0 0 6px 0",
                      "padding", "0 0 8px 0",
                      "borderBottom", "1px solid #ccc"
              ));
      infoList.add(item);
      promptContent.setInfo(infoList);

      nodeJson.setPromptContent(promptContent);
    });
  }
}
/**
* 流程图提示信息
*
* @author warm
*/
@Component
public class ChartExtServiceImpl implements ChartExtService {
/**
* 扩展流程图
* @param defJson 流程定义json对象
*/
@Override
public void execute(DefJson defJson) {
defJson.setTopText("顶部提示信息: 比如流程名称" );
defJson.getNodeList().forEach(nodeJson -> {
// extMap是在分派监听器中设置的, 用户使用的时候不用局限于这种方式, 可以临时查询出来, 或者通过其他方式获取提示信息
Map<String, Object> extMap = nodeJson.getExtMap();
if (MapUtil.isNotEmpty(extMap)) {
for(Map.Entry<String, Object> entry : extMap.entrySet()){
// 添加第二个条目
PromptContent.InfoItem item2 = new PromptContent.InfoItem();
item2.setPrefix(entry.getKey() + ": ");
item2.setContent((String) entry.getValue());
nodeJson.getPromptContent().getInfo().add(item2);
}
}
});
}
}
/**
* 全局监听器: 整个系统只有一个,任务开始、分派、完成和创建时期执行
*
* @author warm
* @since 2024/11/17
*/
@Component
public class CustomGlobalListener implements GlobalListener {
/**
* 分派监听器,动态修改代办任务信息
* @param listenerVariable 监听器变量
*/
@Override
public void assignment(ListenerVariable listenerVariable) {
log.info("全局分派监听器开始执行......");
String defJsonStr = listenerVariable.getInstance().getDefJson();
if (StringUtils.isNotBlank(defJsonStr)) {
DefJson defJson = FlowEngine.jsonConvert.strToBean(defJsonStr, DefJson.class);
for (NodeJson nodeJson : defJson.getNodeList()) {
if (nodeJson.getNodeCode().equals(listenerVariable.getNode().getNodeCode())) {
Long userId = Long.valueOf(listenerVariable.getFlowParams().getHandler());
SysUser sysUser = userService.selectUserById(userId);
if (sysUser != null && StringUtils.isNotEmpty(sysUser.getNickName())) {
nodeJson.getExtMap().put("办理人", sysUser.getNickName());
}
// 年月日时分秒
nodeJson.getExtMap().put("办理时间", LocalDateTime.now().format(DateTimeFormatter.ofPattern("yyyy-MM-dd HH:mm:ss")));
}
}
listenerVariable.getInstance().setDefJson(FlowEngine.jsonConvert.objToStr(defJson));
}
log.info("全局分派监听器执行结束......");
}
}提示框信息解析
<div>
  <p>
    <span>任务名称: </span>
    <span>待提交</span>
  </p>
  <p>
    <span>办理人: </span>
    <span>若依</span>
  </p>
  <p>
    <span>办理时间</span>
    <span>2025-06-06 12:06:06 </span>
  </p>
</div>
{
dialogStyle: { /* 弹框中<div>样式 */
position: 'absolute', /* 绝对定位,基于最近的定位祖先元素(如 container) */
backgroundColor: "#fff", /* 背景色为白色 */
border: "1px solid #ccc", /* 灰色边框 */
borderRadius: "4px", /* 添加圆角 */
boxShadow: "0 2px 8px rgba(0, 0, 0, 0.15)", /* 阴影效果(轻微立体感) */
padding: "8px 12px", /* 内边距(内容与边框的间距) */
fontSize: "14px", /* 字体大小 */
zIndex: 1000, /* 层级高于其他元素,确保提示框可见 */
maxWidth: "500px", /* 最大宽度限制,防止内容过长 */
pointerEvents: 'none', /* ❗️关键点:提示框不响应任何鼠标事件 */
color: "#333" /* 深色文字 */
},
info: [ /* 提示信息列表 */
{
prefix: "任务名称: ", /* 第一条提示信息前缀 */
prefixStyle: { fontWeight: "bold" }, /* 第一条提示信息前缀样式, 对应是span标签的样式 */
content: "组长审批", /* 第一条提示信息内容 */
contentStyle: { /* 第一条提示信息内容样式, 对应是span标签的样式 */
border: '1px solid #d1e9ff',
backgroundColor: "#e8f4ff",
padding: "4px 8px",
borderRadius: "4px"
},
rowStyle: { /* 第一条提示信息行样式, 对应是p标签的样式 */
fontWeight: "bold",
margin: "0 0 6px 0",
padding: "0 0 8px 0",
borderBottom: "1px solid #ccc"
}
},
{
prefix: "负责人: ",
prefixStyle: { fontWeight: "bold" },
content: "李四",
contentStyle: {},
rowStyle: {}
}
]
}3. 显示网格
不管是设计器地址还是流程图地址,请求地址中上拼接showGrid=true,如:
${process.env.VUE_APP_FLOW_API}/warm-flow-ui/index.html?id=${newVal}&type=FlowChart&showGrid=true
&Authorization=Bearer ${getToken()}
4. 暗黑模式
通过postMessage 跨文档通信方法,如:
<iframe id="warmChart" :src="url"  style="width: 100%; height: 100%"/>


// 获取目标窗口对象
const targetWindow = document.getElementById('warmChart').contentWindow;
// theme: theme-dark 暗, theme-light 明
targetWindow.postMessage({type: theme}, "*");
5. 自定义流程图节点颜色
配置文件
# warm-flow工作流配置
warm-flow:
  ...
  ##流程状态对应的三元色
  chart-status-color:
    ## 未办理
    - 157,255,0
    ## 待办理
    - 0,0,0
    ## 已办理
    - 255,205,23
效果图
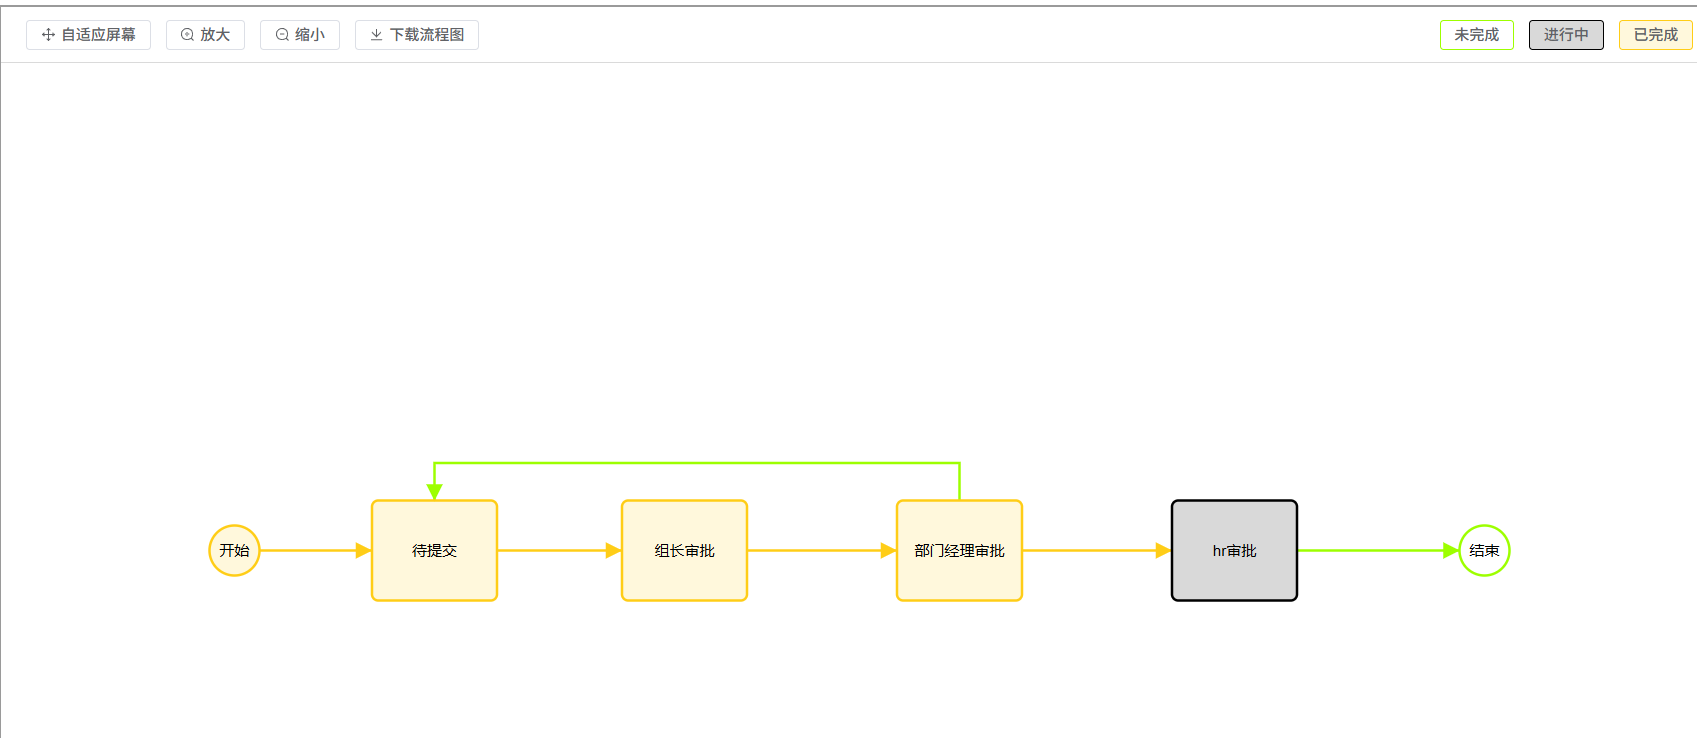
6. 流程图渲染规则
- 目标节点,待办
- 开启流程:
- 初始化流程定义json
- 其他的:未办
- 通过:
- 途径节点和跳转线:已办,
- 退回:
- 途径节点和跳转线:未办,
- 目标节点之后的所有结点和跳转线:未办
- 目标节点是结束节点:
- 目标节点和起始节点:已办
- 所有待办:未办
- 如果办理途径存在并行网关,则需要判断是否需要生成新任务
- 获取目标节点途径最近的并行网关集合
- 根据目标节点递归往上找最近的并行网关,或者直到不是网关为止
- 查询每个并行网关的所有的前置路线,记录总数量和已办理数量,如果已办数量=总数量-1,说明可以生成新任务
- 如果前置节点是非并行网关,总数量+1,已办数量按实际情况记录
- 如果前置节点是并行网关,递归往上找,直至找到非并行网关,记录总数量和已办数量。